Not many of us realized that the PDF (Portable Document Format - the file which encapsulates a complete description of a fixed-layout 2-D document) documents can be edited and most of all can be fill up with texts and figures (type on a pdf file) after it has been created. This is because most of us only have the 'Reader' for the purpose of viewing the pdf documents that we've received from someone. In other words, we could not amend, edit or modify the documents using the "Reader". There are plenty of free to download pdf reader/viewer available such as Adobe Reader, Foxit Reader, PDF XChange Viewer, Sumatra PDF and so on.
 In our daily live as a students, government servants, office workers etc., sometime we have came across forms that has to be filled repeatedly which has only slight changes in content such as application forms, booking forms, order forms, purchase requests and so forth. Conventionally we have to fill it, print it and hand it over, fax it or post it out.
These forms actually can be converted into pdf doc (files) electronically or scanned as images. To make it fillable, we have to modify it or we may create a fresh new form using the Adobe® LiveCycle® Designer (ALD) which is bundled together with the Adobe® Acrobat® Pro (AAP). We may transform any PDF file into an interactive form with various field types and formatting options. The ALD also use scripting features to add even more functionality to PDF forms. We may say it as an advanced pdfs. Adobe® LiveCycle® Designer software provides robust and intuitive tools for creating interactive forms and personalized documents. With this forms, it will enable anyone using the 'Reader' to fill in and save to pdf forms locally. No more printing and faxing.
These forms actually can be converted into pdf doc (files) electronically or scanned as images. To make it fillable, we have to modify it or we may create a fresh new form using the Adobe® LiveCycle® Designer (ALD) which is bundled together with the Adobe® Acrobat® Pro (AAP). We may transform any PDF file into an interactive form with various field types and formatting options. The ALD also use scripting features to add even more functionality to PDF forms. We may say it as an advanced pdfs. Adobe® LiveCycle® Designer software provides robust and intuitive tools for creating interactive forms and personalized documents. With this forms, it will enable anyone using the 'Reader' to fill in and save to pdf forms locally. No more printing and faxing.
However in this post, I will show you how to pdf a document and how to create a simple fillable PDF form using a pdf creator product such as Adobe Acrobat Professional 8.0 and Adobe LiveCycle Designer from an electronically converted pdf document such as pdf document converted from Microsoft Word.
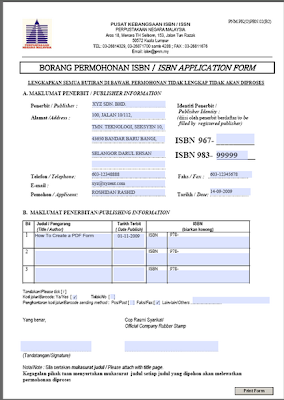
Let us have a sample of a pdf document to work with. For example this application form which was downloaded from Perpustakaan Negara Malaysia for publisher to apply the ISBN for their publications.
First Run the AAP. In the drop down menu under the 'Forms' tab select the 'Create New Form'. [To view pictures clearly, right click and open link in a new tab.]
 |  |
The Pop up menu of 'How would you like to create your interactive form' will appear on the screen. There are four options to select from (i.e., i - Select a template; ii - Start with an electronic document; iii - Import data from a spreadsheet; iv-Scan from paper). In this example we select the second option and click 'Continue'. Then another pop up of the info about creating and distributing forms will appear. Just click 'Continue'.
Another pop up menu will appear for locating the document. Locate the downloaded document by browsing our hard disk and open that particular file. Then click 'Next'.
AAP will import the selected document and created a new pdf document. Then click 'Next'. Another pop up will appear. On this menu, we have to decide how we would like to identify the fields on our document. Choose 'Run Auto Field Detection' and click 'Next' and then 'Next' again. Form fields are automatically recognized and converted to fillable fields.
Congratulation! We've succeeded in creating a new fillable pdf document using AAP. The bluish fields on the document that we've just created represent the fillable areas. Now we are ready to edit our document in ALD. By clicking 'Done' our works in AAP end here.
 |  |
Immediately, ALD will pop opened on the screen with a 'New Form Assistant' menu, showing the third step of the Form Return Setup (i.e, Adding buttons). The first and the second step has been done using the AAP. We have two option here. To add an 'email' button and/or a 'print' button. In this simple example, I decided just to add the 'print' button and unchecked the option for an 'email' button and click 'Finish'.
Now we have a document with a fillable fields in ALD that need to be modified. The document can be edited by deleting unwanted fields and inserting additional fields and adjust them to suit our need.
 |  |
In the 'Design View' tab of the ALD, we can just drag in the Text fields, Numeric Fields, Date/Time Fields, Document Signature Fields, Image Fields and much more from the Library.
After we've added the text fields to the form design, we may edit the caption text and manipulate the object’s properties in the Field, Value, and Binding tabs of the Object palette. We may also define their properties. For example, predefine some fields such as name, address, telephone numbers and so on by inserting the default text on the 'Value' tab. This field however can still be change or edited after the form has been created.
We may preview our fillable pdf form by clicking the 'Preview PDF' tab next to the 'Design View' tab. Finally, if everything is set to our satisfaction, we may save the document and the document now is a fillable pdf document.
Look at this form after it has been modified and makes fillable. Isn't it nice and convenience? Click on it and down load to give it a try and good luck.
You may use pdf maker product such as this New Corel PDF Fusion PDF editor and Converter to convert easily your office document to pdf format within seconds and view over 100 file formats.
Only $69.99.
You may use pdf maker product such as this New Corel PDF Fusion PDF editor and Converter to convert easily your office document to pdf format within seconds and view over 100 file formats.
Only $69.99.
If you like this post, please bookmark and share. Thank you


